Webhooks
Stytch’s webhooks support allows you to keep your internal database records in sync with any changes that occur in Stytch and are out-of-band of your system.
Customers on the Pro tier and above can enroll in webhooks through the Stytch dashboard by specifying a URL(s) at which you wish to receive the webhook POST requests and the type of events you wish to receive.
Stytch’s webhooks are powered through Svix, and you can read the documentation from Svix on receiving and verifying webhooks manually or through their SDKs here.
Overview
Stytch’s webhook event types are segmented by:
- source: the origin of the trigger.
- object_type: the type of entity being acted upon.
- action: type of action taken.
These segments combine to form the event type identifier, following the structure source.object_type.action.
For example, the direct.organization.create event type will be triggered when an Organization is created via API or SDK call. Similarly, the dashboard.update.member event type will be triggered when a Member is updated via the Stytch Dashboard.
Payload structure
Each Stytch event will have the following fields:
- project_id: the Stytch ProjectID that the event is for.
- event_id: a unique UUID of the event.
- action: type of action taken; CREATE, UPDATE or DELETE.
- object_type: the type of entity being acted upon.
- source: the origin of the trigger; DIRECT, DASHBOARD, or SCIM.
- id: the UUID of the entity the action was taken upon.
- timestamp: the ISO 8601 timestamp the event was sent in Stytch (please see Webhooks Disclaimers below).
The payload for CREATE and UPDATE events will also include the full payload object for the entity event type, with the key as the value indicated in the object_type field:
Organization
Member
SAML Connection
OIDC Connection
SCIM Connection
// Example organization create via dashboard (dashboard.organization.create)
{
    "project_id": "project-live-123-...",
    "event_id": "event-live-123-...",
    "action": "CREATE",
    "object_type": "organization",
    "source": "DASHBOARD",
    "id": "organization-live-123-...",
    "timestamp": "2024-03-07T18:49:32.760777783Z",
    "organization": { ... }
}

// Example update member event via SCIM (scim.member.update)
{
    "project_id": "project-live-123-...",
    "event_id": "event-live-456-...",
    "action": "UPDATE",
    "object_type": "member",
    "source": "SCIM",
    "id": "member-live-123-...",
    "timestamp": "2024-03-07T18:49:32.760777783Z",
    "member": { ... }
}

// Example delete SAML connection event via JS SDK or API (direct.saml_connection.delete)
{
    "project_id": "project-live-123-...",
    "event_id": "event-live-789-...",
    "action": "DELETE",
    "object_type": "saml_connection",
    "source": "DIRECT",
    "timestamp": "2024-03-07T18:49:32.760777783Z",
    "id": "saml-connection-live-123-..."
}
Supported Events
Our event types and complete schemas can be found here or in the Webhooks section of the Dashboard.
For each webhook URL you configure in the Stytch Dashboard, you can choose to either receive all events or filter down to just the ones you care about.
Webhooks Disclaimers
Webhooks do not inherently offer ordering guarantees, due to a number of factors including the possibility of intermittant failures and retries, network variability, and optimizing for reliability over strict ordering. You can read more about this topic here.
The recommended approach for protecting against writing stale data due to out of order events is to use the webhook as a signal to pull Stytch. Upon receiving a direct.member.update event, you would then trigger a GET /v1/b2b/organizations/{organization_id}/member API call for the MemberID specified in the event and use the response to update your internal system. This ensures that even if the webhooks are processed out of order, you are always working with the most up to date data.
However, we recognize that every system has different tradeoffs and have included the full entity payload, to provide maximum flexibility in how you wish to process events or determine when to pull Stytch (e.g. only if the event indicates an update to a field you store in your system). We have also included the ISO 8601 timestamp in nanosecond precision that the event was sent -- but please note that this timestamp is not necessarily unique, and is recorded immediately after the DB transaction completes.
Setting up Webhooks in the Dashboard
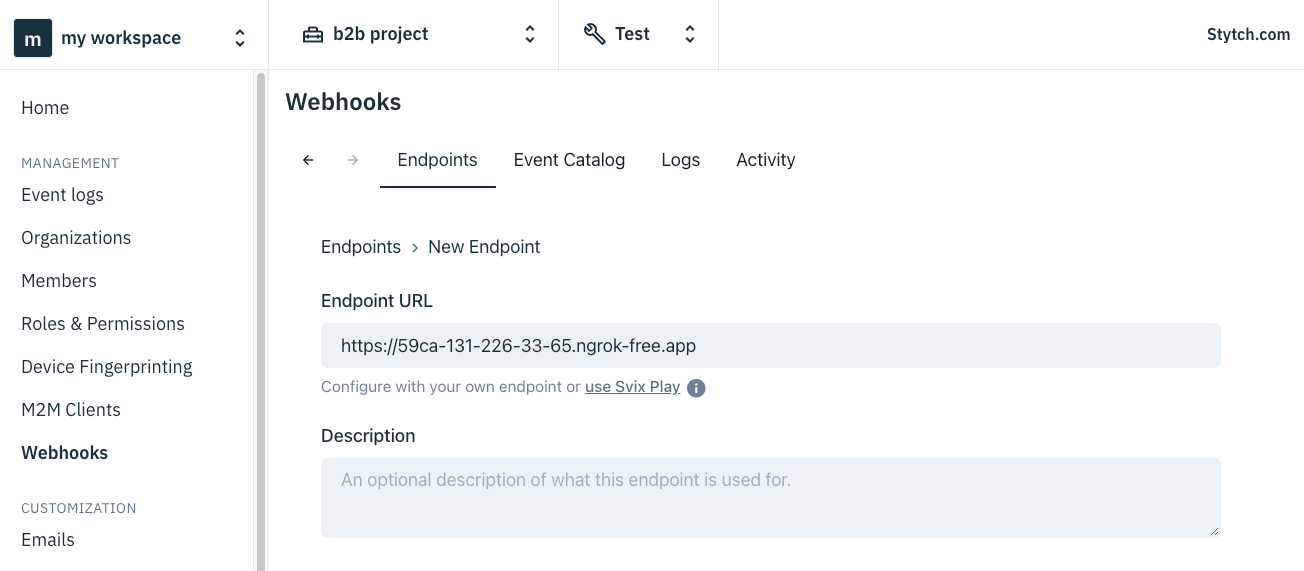
Step 1: Create a webhooks endpoint URL
To begin configuring your webhooks, navigate to the Webhooks section in the Dashboard. You need to be on the B2B Pro tier or above to gain access.
Click + Add Endpoint. This is where you'll define and enter an endpoint URL to which Stytch will send webhook events. The endpoint you specify should be set up on your server to receive POST requests, as this is how Stytch transmits the event data.
You can create multiple webhook endpoint URLs for different events or environments.
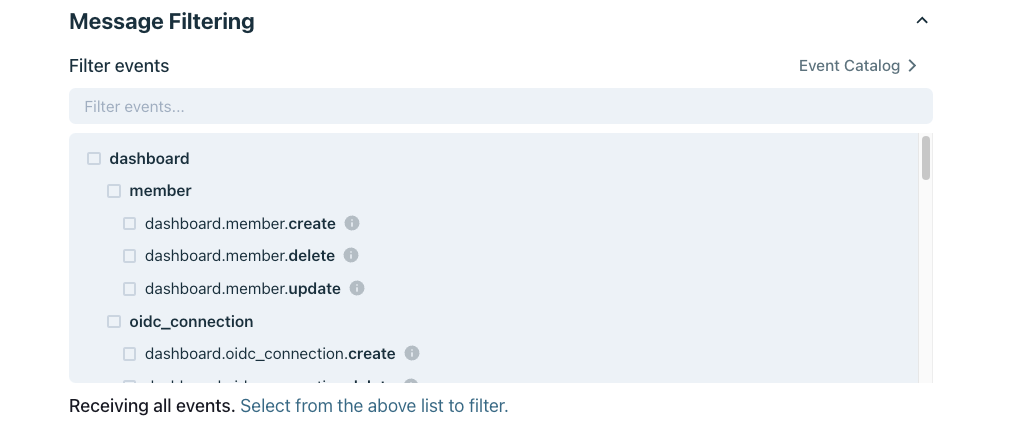
Step 2: Select and filter events
Once you've set up an endpoint URL, the next step is to specify which events you want to receive. You can opt to receive all events or filter for specific event types. Refer to the Stytch events catalog for a complete list.
Click Create at the bottom once you've finished.
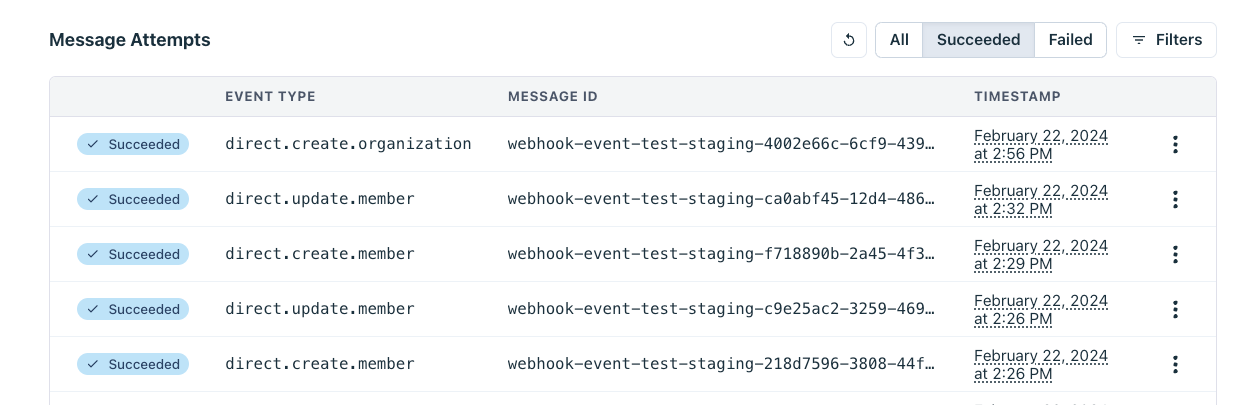
Step 3: Sending and receiving events
With your webhook URLs configured, the final step involves validating that the webhooks are being sent and received. For testing, trigger the events you selected in Step 2 (e.g. Create an Organization in the Dashboard or Update a Member record with an API call). Your server's endpoint should recieve the events, and you should see the events appear in the Message Attempts table, the Logs tab, and the Activity tab.